Asp.Net insert, update, delete, edit,cancel operation in Gridview using DataKey with SQL Server Database
Introduction : In this Tutorial we can expalin how to perform insert, update,delete,select,and Edit operation in asp.net using C#. Here we can use the gridview control for dispaly of data.
Tools : Visual Studio 2010 ,Sql server database
1> First you need to Create new Web Project
2> then after Create Sql database with table name " user_master " as following.
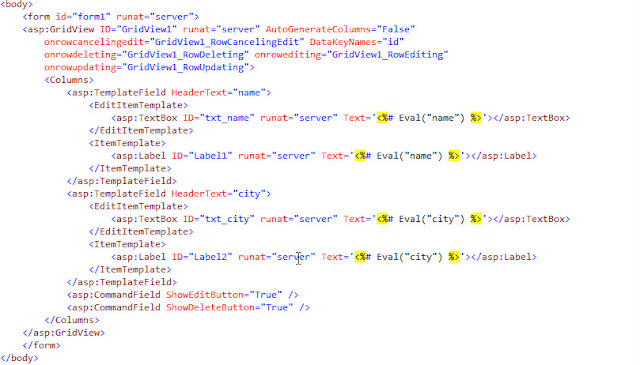
After Creating database need to add webform and give name WebForm2.aspx and add the following html code in Webform.aspx
Now you can need to add class DAL.cs this class is for data acces layer here you can define database structue for accessing data from the database.
Create Class DAL :
public class DAL
{
public int id { get; set; }
public string name { get; set; }
public string city { get; set; }
}
After creating the DAL class now you can need to add BAL.CS class this class known as busseness access layer or logical laye. here we define query logic to whatever data can be access from the database.
Create Class BAL.CS :
public class BAL
{
SqlConnection con = new SqlConnection(@"Data Source=.\SQLEXPRESS;AttachDbFilename=D:
\Gridview_crude_3-tier\App_Data\Database1.mdf;Integrated Security=True;User Instance=True");
public DataTable select_data(DAL da)
{
DataTable dt = new DataTable();
SqlDataAdapter adp = new SqlDataAdapter("select id,name,city from user_master", con);
adp.Fill(dt);
return dt;
}
}
Write Code In WebForm2.aspx.cs :
public partial class WebForm2 : System.Web.UI.Page
{
DataTable dt = new DataTable();
DAL da = new DAL();
BAL ba = new BAL();
SqlConnection con = new SqlConnection(@"Data Source=.\SQLEXPRESS
AttachDbFilename=D:\prog\App_Data\Database1.mdf;IntegratSecurity=True;User
Instance=True");
protected void Page_Load(object sender, EventArgs e){
if (!Page.IsPostBack)
{
grid();
}
}
public void grid()
{
dt = ba.select_data(da);
GridView1.DataSource = dt;
GridView1.DataBind();
}
protected void GridView1_RowCancelingEdit(object sender, GridViewCancelEditEventArgs e)
{
GridView1.EditIndex = -1;
grid();
}
protected void GridView1_RowEditing(object sender, GridViewEditEventArgs e)
{
GridView1.EditIndex = e.NewEditIndex;
grid();
}
protected void GridView1_RowDeleting(object sender, GridViewDeleteEventArgs e)
{
int id = int.Parse(GridView1.DataKeys[e.RowIndex].Value.ToString());
delete(id);
grid();
}
protected void GridView1_RowUpdating(object sender, GridViewUpdateEventArgs e)
{
int id = int.Parse(GridView1.DataKeys[e.RowIndex].Value.ToString());
TextBox txt_name = (TextBox)GridView1.Rows[e.RowIndex].FindControl("txt_name");
TextBox txt_city = (TextBox)GridView1.Rows[e.RowIndex].FindControl("txt_city");
update(id,txt_name.Text,txt_city.Text);
GridView1.EditIndex = -1;
grid();
}
private void update(int id, string txt_name, string txt_city)
{
con.Open();
SqlCommand cmd = new SqlCommand("update user_master set name='" + txt_name + "',
city='" + txt_city + "' where id=" + id + "", con);
cmd.ExecuteNonQuery();
con.Close();
}
private void delete(int id)
{
DAL da = new DAL();
con.Open();
SqlCommand cmd = new SqlCommand("delete from user_master where id='" + id + "'", con);
cmd.ExecuteNonQuery();
con.Close();
}
}
}
Run The Project And Perform Above operation edit the column name
Sign up here with your email


ConversionConversion EmoticonEmoticon