Asp.Net How to Pass Session From One Page To Another Page
Introduction: This Artical Explain how to perform Insert Update Delete Edit Select Operation in asp.net MVC4 using the SQL Server Database. to work with mvc4 you can need .Net Framework 4.5
Step 2: Create Database and Give Table name as user_master

Step 3: Now Create Class DAL.cs Here We can Implement The Logic Of database Access Using this class it can access data or information from database and communicate through controller presentation layer the Code is Below.This Class also called as Model class
* Select Operation Can be perform using List<>
public class DAL
{
public int id { get; set; }
public string name { get; set; }
public string hoby { get; set; }
public string gender { get; set; }
SqlConnection con = new SqlConnection(@"Data Source=(LocalDB)\v11.0;AttachDbFilename=
\MVC_Crude\App_Data\Database1.mdf;Integrated Security=True");
public void insert_data(DAL da)
{
con.Open();
SqlCommand cmd = new SqlCommand("insert into user_master values
('" + da.name + "','" + da.hoby + "','" + da.gender + "')", con);
cmd.ExecuteNonQuery();
con.Close();
}
public List<DAL> Get_data()
{
List<DAL> D = new List<DAL>();
con.Open();
SqlCommand cmd = new SqlCommand("select * from user_master", con);
SqlDataReader dr = cmd.ExecuteReader();
while (dr.Read())
{
DAL da = new DAL();
da.id = Convert.ToInt32(dr["Id"].ToString());
da.name = dr["name"].ToString();
da.hoby = dr["hoby"].ToString();
da.gender = dr["gender"].ToString();
D.Add(da);
}
con.Close();
return D;
}
public List<DAL> edit_data(int id)
{
List<DAL> D = new List<DAL>();
con.Open();
SqlCommand cmd = new SqlCommand("select * from user_master where Id='" + id + "'", con);
SqlDataReader dr = cmd.ExecuteReader();
while (dr.Read())
{
DAL da = new DAL();
da.id = Convert.ToInt32(dr["Id"].ToString());
da.name = dr["name"].ToString();
da.hoby = dr["hoby"].ToString();
da.gender = dr["gender"].ToString();
D.Add(da);
}
con.Close();
return D;
}
public void update_data(DAL da)
{
con.Open();
SqlCommand cmd = new SqlCommand("update user_master set name='" + da.name + "',
hoby='" + da.hoby + "',gender='" + da.gender + "' where Id='" + da.id + "'", con);
cmd.ExecuteNonQuery();
con.Close();
}
public void delete_data(DAL da)
{
con.Open();
SqlCommand cmd = new SqlCommand("delete from user_master where Id='" + da.id + "'", con);
cmd.ExecuteNonQuery();
con.Close();
}
}
Step 4 : Now Create Controller, Controller Can control the database access layer and presentation layer means it can controll Model and View.
public class ABCController : Controller
{
public ActionResult Index()
{
return View();
}
[HttpGet]
public ActionResult Insert()
{
return View();
}
[HttpPost]
public ActionResult Insert(DAL da)
{
da.insert_data(da);
ViewBag.Message = "Data Inserted Succesfully.........";
return View();
}
[HttpPost]
public ActionResult Select()
{
return View();
}
[HttpGet]
public ActionResult Select(DAL da)
{
// da.Get_data(da);
return View(da.Get_data());
}
[HttpGet]
public ActionResult Edit(int id)
{
DAL da = new DAL();
return View(da.edit_data(id).FirstOrDefault());
}
[HttpPost]
public ActionResult Edit(DAL da)
{
da.update_data(da);
return View(da);
}
[HttpGet]
public ActionResult Delete(int id)
{
DAL da = new DAL();
return View(da.edit_data(id).FirstOrDefault());
}
[HttpPost]
public ActionResult Delete(DAL da)
{
da.delete_data(da);
return View();
}
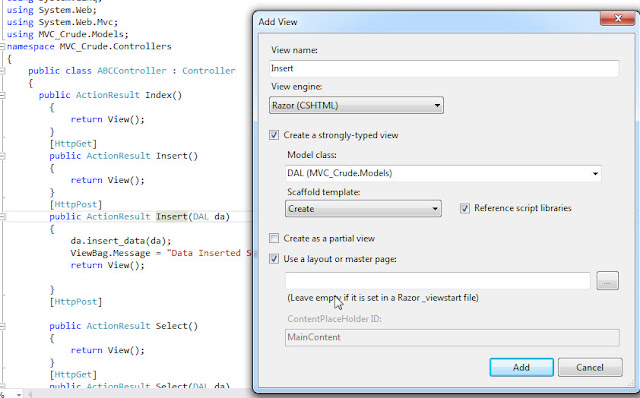
Step 5 : Create View,For Create Insert View Right Click on "public ActionResult Insert(DAL da)"
and Select the view According Below Image. select Strongly type and Model class As DAL.cs for Creating Edit,delete view,select view you can proceed same as insert view Below.
After Click on Add Button Insert View Can be Created As Below. only you can add view for radiobutton like below code

@model MVC_Crude.Models.DAL
@{
ViewBag.Title = "Insert";
}
<h2>Insert</h2>
@using (Html.BeginForm()) {
@Html.ValidationSummary(true)
<fieldset>
<legend>DAL</legend>
<div class="editor-label">
@Html.LabelFor(model => model.name)
</div>
<div class="editor-field">
@Html.EditorFor(model => model.name)
@Html.ValidationMessageFor(model => model.name)
</div>
<div class="editor-label">
@Html.LabelFor(model => model.hoby)
</div>
<div class="editor-field">
@Html.DropDownListFor(model => model.hoby,new SelectListItem[] {
new SelectListItem(){Text="Amreli",Value="Amreli"} ,
new SelectListItem(){Text="Suart",Value="Surat"} },"--select--")
@Html.ValidationMessageFor(model => model.hoby)
</div>
<div class="editor-label">
@Html.LabelFor(model => model.gender)
</div>
<div class="editor-field">
@Html.RadioButtonFor(model => model.gender,"Male",true)Male
@Html.RadioButtonFor(model => model.gender,"Female",false)Female
@Html.ValidationMessageFor(model => model.gender)
</div>
<div>
@ViewBag.Message
</div>
<p>
<input type="submit" value="Create" />
</p>
</fieldset>
}
<div>
@Html.ActionLink("Back to List", "Select")
</div>
@section Scripts {
@Scripts.Render("~/bundles/jqueryval")
}
Step 6: Run Project by URL localhost:/controller name/view name
Step 7 : To perform Edit Delete Select operation Create view same as above for This operation
See Other Tutorial :
* AngularJS With ASP.NET MVC
* Convert Rows to columns using 'Pivot' in SQL Server
* Mvc Registration page With user exist using Ajax method
* MVC 4 How to Perform Insert Update Delete Edit Select Operation
* MVC4 Edit,update,Delete,cancel inside gridview using sql database
* MVC 4 Gridview To Display Data Using SQL Server Database With Simple code
* Login page in asp.net Mvc4 Web application
* Mvc4 How to bind Dropdown List using Sql Database
* Gridview find control in asp.net
Sign up here with your email


4 comments
Write commentsAwesome this is what i was looking for (y)
Replythanks shayan
ReplyThis is rally cool article have a look the simpler article.Click here........
ReplyCool.....
ReplyHow to Create LOV (list of Values for record Selection) to get record from reference table and save it to another table.
ConversionConversion EmoticonEmoticon